Erika’s Pumpkin Chocolate Chip Cookies

Erika is one of my best friends from college who made this cookie every fall and I can’t get enough of them! This is the perfect ending to your Thanksgiving feast. Move over Pumpkin Pie, here comes the Pumpkin cookie!


3/4 Cup of Shortening

1 1/2 tsp. Vanilla

2 EggsErika's Pumpkin Chocolate Chip Cookies

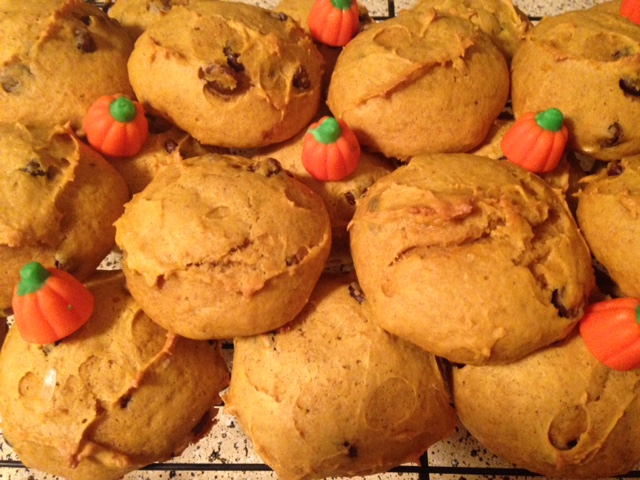
1 Small Can of Pumpkin Puree

2 1/4 Cups of Sugar

3 3/4 Cups of Flour

1 1/2 tsp. Baking Powder

1 1/2 tsp. Baking Soda

1/4 tsp. Salt

1 1/2 tsp. Pumpkin Pie Spice

1/2 – 16oz Bag of  Semi-Sweet Chocolate Chips


Preheat oven to 350 degrees.

In a standing mixer add shortening, vanilla and eggs. Mix together until becomes “fluffy” about 3-4 min.

Add pumpkin puree and mix again for 2 min.

In a separate bowl add sugar, flour, baking powder, baking soda, salt and pumpkin pie spice. Mix the dry ingredients together.

Slowly add the dry ingredients to the wet ingredients while the mixture is mixing. Once it has all combined add the chocolate chips.

Scoop the dough into 1/2 inch balls and place onto a cookie sheet.

Bake for 14-17 min. You know that the cookies are done when they are firm to the touch.

Enjoy!


TIPS:

At the beginning when it says mix until “fluffy” you are looking for a mixture with bubbles forming on the sides of the bowl. Sort of the same concept when you fluff eggs for scrambled eggs.

The original recipe called for the entire bag of chocolate chips. I did this the first time and found that the cookie was too chocolate heavy and couldn’t taste the pumpkin. So the second time I used only half the bag and it was the perfect contrast of chocolate to pumpkin flavor.

When it comes to size, you can make it small or large it doesn’t matter. However cooking times will be different. You really need to make sure your cookie is firm to the touch before pulling them out. This makes sure that the cookie is done and not raw on the top. I used my medium ice cream scoop for my cookies and cooked them for 17 min.

Thank You Erika and Ellis Family!

Pumpkin Rigatoni with Bacon

What is the first thing you think about when I say “pumpkin?” Dessert..right? Well I am here to share with you a pumpkin pasta perfect for dinner.


16oz Box of Rigatoni

1 tsp. Olive Oil

5 Strips of Bacon (chopped)Pumpkin Rigatoni with Bacon

1/2 Onion (diced)

1/2 Cup of Pumpkin Puree

1/8 tsp. Pumpkin Pie Spice

3/4 Cup of Heavy Cream

1/2 Cup of Chicken Stock

1/4 Cup of Parmesan Cheese

6 Sage Leaves (Chopped)

Salt & Pepper


Take a large pot of salted water and bring to a boil. Add Rigatoni and cook for 1 min less then the cooking time it specifies on the box. After it is done drain pasta and place into a big bowl and set aside.

As the pasta is cooking.. Grab a large skillet and set to medium heat. Add the chopped bacon pieces and cook until bacon is golden brown. Then take the bacon pieces and place onto a plate layered with paper towels and set aside.

Using the same skillet with the leftover bacon grease add the diced onion. Cook for 2-3 min until onions are translucent.

Now add pumpkin puree, pumpkin pie spice, heavy cream and chicken stock. Stir for 5-7 min until sauce is thick.

Lastly add the Parmesan cheese, chopped sage, salt and pepper.

Take your finished sauce and pour over your rigatoni and mix the pasta until it comes together.

Finish with more Parmesan cheese and bacon pieces.


TIPS:

I had fun trying out a new pasta shape! Rigatoni worked really well to keep the sauce coated all over the noodle. I guess you could use any shape you want, but I would suggest using a noddle like Penne, Campanelle or medium shells.

Cooking the pasta 1 min less is a trick I learned from Mario Batali. Now no, I haven’t met him in person. But watching “The Chew” he always says this tip when cooking pasta. You do this so that the pasta comes out “al dente” which means perfectly cooked with a small bite to the pasta.

Make sure your skillet is not too HOT! I said to use medium which if you have a dial temperature gauge with numbers I use 4. Why? You don’t want the bacon grease to burn. You want it to stay at a golden brown color before adding the onions. If the grease gets too dark it makes your sauce bitter and the flavor of the bacon is lost. Gentle heat is the key!

You can use chicken stock from a can, box or bouillon cube. Whatever you have on hand or the cheapest for your budget.. go for it!

Please use FRESH PARMESAN CHEESE! Go out and buy the wedge Parmesan cheese that you hand grate. Don’t even think about pre-shredded! Already pre-shredded cheese won’t melt properly in the sauce, it will leave grains that don’t give off a great texture. You should be able to find the wedge Parmesan cheese next to the Mozzarella cheese and Italian Ravioli.

If you don’t know how to approach chopping up the sage leaves, then use the “Chiffonade” cutting technique. Stack your leaves one on top of the other and then roll them up into a tight bundle. Now cut from one end to the other creating “ribbons.” Perfect technique for cutting up any type herbs.

Pumpkin Waffles

Thanksgiving is 1 week away!! What better way to start out your holiday fest by serving a classic waffle with the season’s favorite flavor, Pumpkin!


1 3/4 Cup Flour

2 TBSP Sugar

1 tsp. Baking powderPumpkin Waffles

1/2 tsp. Baking Soda

1/4 tsp. Salt

1 tsp. Pumpkin Pie Spice

2 Eggs

1 1/2 Cups Milk

1/4 Cup Vegetable oil

1 tsp. Vanilla


Plug in Waffle Iron and set to 4 on the heat index.

Take a large bowl and add flour, sugar, baking powder, baking soda, salt and pumpkin pie spice. Sir together and create a well in the middle of the bowl.

Now take another bowl and add eggs, milk, vegetable oil and vanilla. Mix together until all is combined.

Add the wet ingredients to the center well in the dry ingredients bowl and mix everything together. This will take about 2 min.

Set mixture aside for 5 min.

Use a 1/2 measuring cup and scoop out your waffle batter into the middle of your waffle iron and close the top. Usually your waffle iron will give a “green” light or “beep” when it is done.

Serve one at a time or set your oven on 300 degrees and take a cookie sheet with a cooling rack on top and place the completed waffles on top of the rack. This will keep waffles hot when you want to serve family style at the table.


TIPS:

I like to use vegetable oil since it is the cheapest option at the store, but you can also use canola if you have that on hand.

With this recipe I used whole milk, but again just use what you have in your fridge.

I said to mix the wet and dry ingredients together for about 2 min. You are looking for all the dry to be incorporated and it is ok to have a few lumps.

I set the completed waffle batter aside to let the baking powder and baking soda activate to make fluffy waffles!

If you find you like your waffles more crisp, set your waffle iron to 5 or a higher setting. This is your preference.

If you find that 1/2 cup of batter isn’t enough.. just add a bit more to find the perfect measurement to make your ideal waffle.


Pancake Muffin with Breakfast Hash

As the Holiday season as approaching, many of us are playing host to our families and friends. Here is a great recipe to make an impression to those you serve. It will be requested for many years to come.


3 Eggs

1/2 Cup of Flour

1/2 Cup of Milk

1/4 tsp. SaltPancake Muffin with Breakfast Hash

1/2 tsp. Vanilla

2 TBSP of Butter (melted)

1/4 lb of Sausage (Jimmy Dean brand)

1 Large Yukon Gold Potato

1 Green Onion

1/4 Cup of Maple Syrup

Salt & Pepper


Preheat oven to 400 degrees.

Take a muffin pan and lightly grease with oil spray.

Heat a skillet pan to medium heat.

Dice your potato into 1/2 inch cubes.

Add your sausage to the skillet and break into small pieces. Cook until sausage is evenly brown.

Remove sausage from the skillet and add diced potatoes and 1 TBSP of butter. Cook the potatoes for 10-12 min until they are golden brown and tender. The last 3 min of cooking add salt and pepper. Once it is finished cooking add chopped green onion on top.

In a large bowl add eggs, flour, milk, salt, and vanilla. Mix together using a whisk or an immersion blender. Once it is well mixed (no lumps) add half of the melted butter and mix again. Then add the other half of the butter and mix one last time.

Pour your egg mixture into the muffin pan using a 1/4 measuring cup for each muffin section.

Bake for 15-20 min.

Assemble by placing a pancake on a plate, add 2-3 spoonfuls of filling on top and finish with drizzled syrup.


TIPS

I used Yukon Gold Potato because it has less starch which help it to brown up easily and become tender and fluffy in the inside. You can use Russets (which is my usual go to potato) it may take longer to cook.

Make sure to cook the sausage first! This insures that your potatoes absorb the sausage flavor as they cook in the pan.

When making a hash it has no rules. You can add whatever you want! As I think about it if I had an onion and green or red bell peppers I would have added this as well. If you do decide to add more to your hash just cook it with the potatoes.

This pancake is similar to my previous recipe “Lemon Drop German Pancake” see link ( https://outoftheboxcooking.wordpress.com/2015/05/26/lemon-drop-german-pancake/ ) but this time it is the basic recipe and is individualized.

When cooking the pancake you want it to have a golden brown top, that is when you know it is ready.

When putting the filling on top of the pancakes don’t worry if you end up mashing it down. The goal is to get as much of the filling on top as you can.

Heat up my syrup before drizzling, it is better hot than cold.


Classic Lasagna

When people think Lasagna, two things come up. One, it takes too long and it’s difficult to make. I am here to say, yes it may take patience and skill to make a perfect lasagna, but if you follow my instructions you will be proud of the results!


1 Lb Ground Beef

12 Lasagna Noodles

1 28oz Can of Crushed TomatoesClassic Lasagna

1/2 Onion

1 1/2 TBSP of Italian Seasoning

1/2 tsp. of Dried Oregano

1 tsp. of Garlic Powder

1/2 Cup Water

1 16oz tub of Low-fat Cottage Cheese

4 Cups Shredded Mozzarella Cheese

4 Cups Cheddar Cheese

Salt & Pepper

Olive Oil


Take a large pan and bring to medium heat.

Add ground beef and onions to the pan. Cook until beef is no longer pink and onions are translucent. Drain meat mixture to get rid of the excess fat and return to the pan.

Now add can of crushed tomatoes, water, italian seasoning, oregano, garlic powder, salt & pepper.

Mix everything together and cook on low for 45-60min.

Take a bowl and line it with paper towels. Now add the whole tub of cottage cheese. Let the extra milk fat drain. Set aside until ready to assemble.

Bring a large pot of water with 1 TBSP salt and 1 TBSP of Olive Oil to a boil.

Once the pot is at a boil add 3 noodles at a time to the pot. Once the noodles are completely submerged into the water set a timer for 4 min. After 4 minutes take the noodles out and set aside on a cutting board. Keep doing this to the rest of the noodles until all are cooked.

Preheat oven to 350 degrees.

Go ahead and shred your mozzarella and cheddar cheeses.

Take out a 9X13 pan and lightly grease the pan.

Add about 2 TBSP of meat mixture and spread on the bottom of the pan and take 3 lasagna noodles and lay them down to start the first layer. Now add about 1/4 cup of the meat mixture and spread out to cover the noodles. Next add about 1/8 cup of cottage cheese and again spread it out. Lastly, add about 1 cup of mozzarella and 1 cup of cheddar cheese. Now repeat by adding another 3 lasagna noodles on top and repeat until you get to the last layer.

For the last layer only add the final amount of meat mixture, mozzarella and cheddar cheese. Then add a drizzle of olive oil on top.

Cover with foil and bake for 35-40min. Then remove the foil and bake again for an additional 15-20min.

Enjoy!


TIPS:

You don’t have to make this all in one day. What I did was make the meat mixture the day before and place it into the fridge until you are ready to assemble.

The reason why I drain the cottage cheese is because it prevents the lasagna from becoming “soupy.” Now you can make this more authentic by using ricotta cheese and you don’t have to drain ricotta since it doesn’t have excess milk. It is up to you!

You may be asking, “Why cook the noddles for 4 min and only 3 at a time?” Here is my answer. When you cook the noodles all the way done and then assemble the lasagna it causes the noddles to over cook in the oven. This causes the noodles to not absorb the liquid from the filling and will make the lasagna fall apart. Using this new method it prevents over cooking the noodles and helps the noodles not stick together while assembling the lasagna.

Notice that I approximate how much meat & cheese I put in-between the layers. I don’t have exact amounts, so when doing this process just know that you need enough meat mixture, Mozzarella & Cheddar Cheese to last all 4 layers and enough cottage cheese to last 3 layers.

To prevent the cheese from sticking onto the foil when baking, take oilve oil and spread it all over the foil and then place it over the lasagna.

The reason why you bake twice is because the first time you are combining all the flavors and the second time is for the cheese on top to melt and become “bubbly” and slightly brown to create a nice crust.

Black Bean & Lime Rice Tacos

1/4lb Ground Chuck

1 15oz Can of Black BeansBlack Bean & Lime Rice

1 10oz Can of Rotel

2 Cobs of Fresh Corn

1/4 Large Onion

1 1/2 tsp. Cumin

1 1/2 tsp. Chili Powder

Salt & Pepper

1 1/2 + 1/4 Cups Water

1 Cup RiceTaco2

1 Lime

10 Flour Tortillas

Toppings:

Cheese

Salsa

Cilantro


Preheat oven to 275 F.

In a large skillet brown the ground chuck and drain off excess fat.

In the same skillet add onion and cook for 3-4 min until onion is translucent.

Add the black beans (drained and rinsed), corn (cut from the cob), rotel, ground chuck, cumin, chili powder, salt & pepper and 1/4 cup of water. Mix together and let simmer on medium-low heat string occasionally. Once the black bean mixture is reduced and is thick, it is ready to eat.

Take a pot and bring 1 1/2 cups of water to a boil over high heat. Once boiling add 1 cup of rice, stir and place a lid on the pot. Turn heat to medium-low and cook for 15 min.

Wrap your tortillas in foil and place in the oven to get warm.

After 15 min, remove rice from heat and let sit for an additional 5 min. (do not take the lid off)

When your rice is done, zest one lime and add to the rice along with the lime juice. Mix together.

Present every component “family-style” (separately) at the table. Also include cheese, salsa and cilantro for toppings.


TIPS:

If you don’t have cumin or chili powder in your pantry, you can use 1 packet of taco seasoning instead.

When taking the corn off the cob, be careful! Just run a sharp knife down the cob and the kernels will fall off. Go slowly so that you don’t hurt yourself. If you don’t want to use fresh corn it is ok to use 1 can of corn.

Don’t have an instrument to zest a lime? No worries, just add the juice. If you still can’t taste lime go ahead and add more lime juice.

You can always omit the beef and have this be a vegetarian dish!

Want it spicy? Add 1 jalapeno when you are first cooking the onion for the black bean mixture.

Red, White & Blue Cupcakes

Happy 4th of July! This is a perfect treat to eat while sitting out enjoying the fireworks!


1 Box of White Cake Mix

3 Eggs

1/3 Cup OilRed, White & Blue Cupcakes

1/2 Cup Water

2 Cups Powdered Sugar

1/2 Cup Butter (Softened)

1 tsp. Vanilla Extract

2-3 TBSP Milk

Blue & Red Food Coloring

White Cupcake Liners


Preheat oven to 350 F.

In a bowl add cake mix, eggs, water and oil.

Mix together until combined. Add 20 drops of red food coloring to the mix and stir.

Place your white cupcake liners inside the cupcake pan and fill each one with the red cake mixture about 1/2 full.

Bake for 18- 22 min. Let cupcakes cool for 20 min after baking.

In a separate bowl mix powdered sugar, softened butter and vanilla extract.

Add the milk one TBSP at a time until it becomes together with no lumps.

Next add 15- 20 drops of blue food coloring and stir the frosting until combined.

Take your red cupcake and top it with the blue frosting.

20-24 servings.


TIPS:

I know that this recipe is “in a box” but I also strive to take those things and turn them into something new. So I am keeping with my premise of “out of the box cooking” 🙂

With the food coloring, I used the regular liquid food coloring that you find anywhere at the store.

Make sure to add plenty of food coloring to the cake mix and frosting to get a dark and vibrant red and blue color, especially red! You don’t want pink cupcakes!

For the frosting, I ended up using x2 amount of vanilla (since I was using the artificial stuff.) If you do have the real bottles of vanilla stick to the 1 tsp.

When adding milk to the frosting add slowly and don’t worry if you need to add more to tone down sweetness or to make the frosting smoother. I ended up using a bit more to get a smooth texture.

I doubled the cupcake liners so that the white color would be represented, but you can just use one.

Take your cupcakes one step further and add decorations to the top. Maybe a flag, sprinkles, etc. Be imaginative and make it your own!

Easy Fried Rice

I have been working hard with this recipe and I am happy to dedicate this to my sister, Ashlie. I know that she loves Chinese and now she can make this for her family!


1 1/2 Cups Water

1 Cup RiceEasy Fried Rice

1/2 Onion

1/2 Cup Peas

1/2 Cup Carrots

3 Eggs (scrambled)

2 tsp. Olive Oil

3-4 TBSP Soy Sauce

1 1/2 tsp. Toasted Sesame Oil

1/4 tsp. Red Pepper Flakes

2 TSBP Garlic Butter


In a medium pot boil 1 1/2 cups of water. Once it comes to a boil add rice, stir and place a lid on the pot. Lower heat to medium low for 15 min.

After 15 min take the pot off the heat and let sit for an additional 5 min.

Place a large skillet over medium high heat and add olive oil.

When the oil starts to ripple and the pan is hot add onion and cook for 3 min.

Push the onion to the outside of the pan and add eggs. While cooking eggs keep stirring them around until they are cooked.

Now add rice, peas, and carrots. Mix all together and cook for 2 min.

Add soy sauce, toasted sesame oil, red pepper flakes. Stir everything together and spread out evenly and let cook for 3 min. Now add garlic butter. Stir everything together, again and repeat spreading the mixture out in the pan and cook for an additional 3 min.

It is now ready to eat!


TIPS:

You can make this ahead of time by putting the rice in the fridge overnight and it will be even better. But I have done this several times without using leftover rice and it turns out just fine.

DO NOT TAKE LID OFF RICE! Wait until the entire 20 minutes have expired, then take the lid off. That is the #1 mistake when making rice. No worries, it will cook.

“Scrambled” eggs is just put the eggs in a separate container and whip together before adding to the skillet.

If you have the frozen mixed peas and carrots just use 1 cup. I like to use the frozen veggies because it is easy, no chopping!

I make my own garlic butter. I use 2 TBSP of butter and 1 TBSP garlic salt. Mix together and it is ready.

Toasted Sesame Oil can be found in the Asian section of the store near the soy sauce. This is the one flavoring that makes your fried rice taste like the fried rice you have at a restaurant.

Keeping your skillet HOT is the key to fried rice. Once you start getting the brown toasted rice throughout the mixture you know that it is done.If you don’t get the brown toasted rice, keep cooking for 3 min intervals after mixing and spreading it out in the skillet.

Make this your own! Add chicken, broccoli, snow peas, etc. I have been wanting to add pineapple.. yum!

Lemon Drop German Pancake

This past weekend I had this idea to take my original German Pancake recipe and add lemon to it. Perfection! Immediately after tasting it reminded me of eating  lemon drop. If you like lemon, give this a try!


6 Eggs

1 Cup Milk

1 Cup Flour

Zest of 2 Lemonslemon Drop German Pancake

1 TBSP Lemon Juice

1/4 tsp. Salt

1/2 tsp. Vanilla

2 TBSP Sugar

2 TBSP Butter

Glaze:

1 Cup Powdered Sugar

2-4 tsp. Lemon Juice


Preheat oven 400 F.

In a medium bowl mix together eggs and milk.

Slowly add the flour, mixing as you go.lemon2

Add lemon zest, juice, salt, vanilla and sugar.

Stir the mixture until there are no flour lumps in the batter.

Once oven is preheated take a 9×13 pan and add the butter to the pan and set it into the oven to melt.

Now that the butter is melted, turn the pan in different directions so that the butter is evenly coated the bottom of the pan.

Add the egg batter to the pan and place into the oven for 20-25 min. Edges should be brown and the whole pancake will rise.

Make the glaze by adding enough lemon juice to make the powdered sugar thin and glaze like.

Add the glaze to the pancake once it comes out of the oven and let sit for 5 min.


TIPS:

When using lemons, make sure to zest them before juicing. It is quite difficult to zest a lemon that is no longer round.

I used whole milk, but I have made this with 1% and it is fine. My opinion, if you have milk then use it.

DO NOT OPEN OVEN WHILE BAKING! This batter is very delicate and will deflate fast. If you need to see if it is done, use the oven light. Best indicator to look for is brown edges and a golden color in the middle.

You don’t like lemon? Instead of the lemon flavorings add:

2 tsp. vanilla

1 tsp. cinnamon

If you do make the version without lemon, you can top the pancake with syrup or my favorite is powered sugar and syrup!

Homemade Pepperoni Pizza

From the crust to the pizza sauce it is all made from scratch.  This recipe will satisfy your cravings without the extra $$ from a normal delivery pizza.


Crust:

1 Package of Active Dry Yest OR 2 1/4 tsp. of Yeast

1 tsp. Sugar

1 Cup of Warm Water

2 TBSP Olive OilHomemade Pepperoni Pizza

1 tsp. Salt

2 1/2 Cups Flour

Cornmeal

Sauce:

1 16oz can of Tomato Sauce

1 TBSP Dried Onion

2 tsp. Italian Seasoning

1 tsp. Garlic Power

1/2 tsp. Salt

1/4 tsp. Pepper.

Toppings:

Shredded Cheese

Pepperoni Slices


Preheat oven to 450 F.

In a pot add the tomato sauce, dried onions, italian seasoning, garlic powder, salt & pepper.

Let sauce cook at a medium-low heat for 20 min and then remove from heat to cool.

In a medium bowl add yeast, sugar and water. Let sit for 10 min.

Add olive oil and salt. Mix together and then add the flour.

Once it comes together as a “ball” place the dough onto a floured board or surface.

Start to knead the dough into the flour until it is no longer sticky, about 5-8 min. It should become a smooth dough. Let it rest for 12 min.

Roll dough out into a rectangle that should mirror the same size as a cookie sheet.

Spread an even layer of cornmeal onto a cookie sheet.

Transport dough onto the cookie sheet and bake for 8 min.

Now add your pizza sauce, cheese and pepperoni and place back into the oven for an additional 10-12 min, until crust is golden brown on the edges.


TIPS:

For the sauce, I actually use half of a 28oz can of crushed tomatoes. I like to use crushed tomatoes because they have small pieces of tomato that I find give off more flavor. It also will make it a bit thicker, then if you use tomato sauce.

The best thing about this pizza dough is that you don’t need your standing mixer! (But you will be ok if you decide to go ahead an use one.)

Kneading dough 101: When placing the dough onto the floured surface you start by folding the dough in half using the palm of your hand. Then, still using the palm of your hand, push the dough forward. And continue to fold and push forward. *You may have to add more flour as you go, because you want the dough to be smooth, so add flour in small amounts*

Cornmeal is a great way to make your crust have a “crunchy” bite to it. Bonus! You don’t have to worry about greasing the pan.

Don’t you hate it when pepperoni slices are not crispy on your pizza? Good news! My wonderful mother-in-law taught me a trick for crispy pepperoni. Place paper towels onto a plate and add the slices on top. Now microwave it for about 1 min. All of the grease will soak into the paper towels and you will have semi-crispy peperoni to top onto the pizza. While it continues to cook in the oven, the pepperoni will get even more crispy!